Spring源码分析-04-AOP解析

- PS: 若文章字体偏大或者偏小,建议通过 ctrl键+鼠标滑轮 进行修改,以提升阅读效果.(带来不便,请谅解!)
Version:
- jdk 1.8
- Spring: 5.1.7
AOP使用流程:
- 导入aop 模块 spring-aop
- 定义业务逻辑类 MathCalculator: 定义了 除法div () .
- 定义切面类: LogAspects: 这里面定义了@PointCut切入点, @Before ,@After, @AfterReturn,@AfterThrowing 方法 .
- 定义了配置类MainConfigOfAOP. 开启AOP(@EnableAspectJAutoProxy)功能,并将MathCalculator,LogAspects 注入到 Spring中.
测试类:
main 方法:
	@Test
	public void test01(){
		AnnotationConfigApplicationContext applicationContext = new AnnotationConfigApplicationContext(MainConfigOfAOP.class);

		//1、不要自己创建对象
//		MathCalculator mathCalculator = new MathCalculator();
//		mathCalculator.div(1, 1);
		MathCalculator mathCalculator = applicationContext.getBean(MathCalculator.class);
	 	 System.out.println(" ====================normal============== ");
        mathCalculator.div(4, 2);

        System.out.println(" ====================== error ============");

        mathCalculator.div(1, 0);

		applicationContext.close();
	}
配置类:
@EnableAspectJAutoProxy
@Configuration
//@ComponentScan("com.atguigu.bean")
public class MainConfigOfAOP {

	//业务逻辑类加入容器中
	@Bean
	public MathCalculator calculator(){
		return new MathCalculator();
	}

	//切面类加入到容器中
	@Bean()
	public LogAspects logAspects(){
		return new LogAspects();
	}
}
业务类:
- MathCaculator.java
public class MathCalculator {

	public int div(int i,int j){
		System.out.println("MathCalculator...div...");
		return i/j;
	}

}
切面:
@Aspect
public class LogAspects {

   //抽取公共的切入点表达式
   //1、本类引用
   //2、其他的切面引用
   @Pointcut("execution(public int com.atguigu.aop.MathCalculator.*(..))")
   public void pointCut(){};

   //@Before在目标方法之前切入;切入点表达式(指定在哪个方法切入)
   @Before("pointCut()")
   public void logStart(JoinPoint joinPoint){
      Object[] args = joinPoint.getArgs();
      System.out.println(""+joinPoint.getSignature().getName()+"运行。。。@Before:参数列表是:{"+Arrays.asList(args)+"}");
   }

   @After("com.atguigu.aop.LogAspects.pointCut()")
   public void logEnd(JoinPoint joinPoint){
      System.out.println(""+joinPoint.getSignature().getName()+"结束。。。@After");
   }

   //JoinPoint一定要出现在参数表的第一位
   @AfterReturning(value="pointCut()",returning="result")
   public void logReturn(JoinPoint joinPoint,Object result){
      System.out.println(""+joinPoint.getSignature().getName()+"正常返回。。。@AfterReturning:运行结果:{"+result+"}");
   }

   @AfterThrowing(value="pointCut()",throwing="exception")
   public void logException(JoinPoint joinPoint,Exception exception){
      System.out.println(""+joinPoint.getSignature().getName()+"异常。。。异常信息:{"+exception+"}");
   }

}
方法执行结果:

人话描述过程:
AOP的开启过程:
注册Bean定义信息:
- 堆栈信息图:
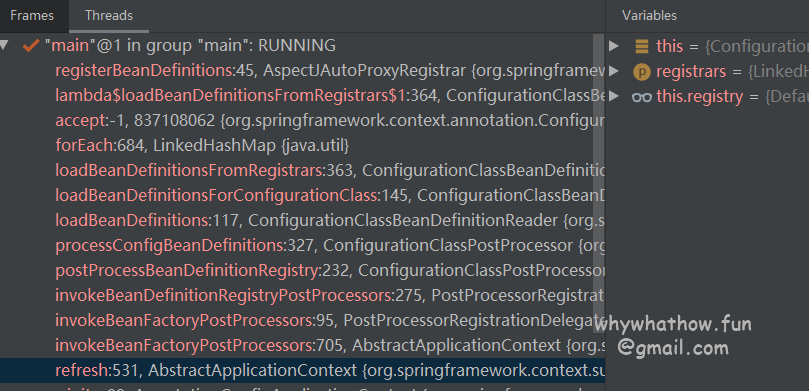
有图可以知道 以下执行流程:
1. 注册BeanDefinition
AbstractApplicationContext.refresh()
    -> AbstractApplicationContext.invokeBeanFactoryPostProcessors() /// 注册 org.springframework.aop.config.internalAutoProxyCreator 的 BeanDefinition
    	->invokeBeanDefinitionRegistryPostPRocessors()
    	-> ...
    	-> AspectJAutoProxyRegistrar.registerBeanDefinitions()
实例化 对象
AnnotationAwareAspectJAutoProxyCreator.class ```java 2. 生成实例对象 AbstractApplicationContext.refresh() -> AbstractApplicationContext.invokeBeanFactoryPostProcessors() // 在这执行的原因 AnnotationAwareAspectJAutoProxyCreator 实现了 BeanPostProcessor 接口 -> ..... -> AbstractApplicationContext.registerBeanPostProcessors() /// 生成 internalAutoProxyCreator -> doGetBean() ->doCreatebean()
小总结:
- @EnableAspectJAutoProxy
注册BeanDefinition 注册 org.springframework.aop.config.internalAutoProxyCreator 的bean定义信息
**refresh()-> invokeBeanFactoryPostProcessors()**实例化对象: 实例化 org.springframework.aop.aspectj.annotation.AnnotationAwareAspectJAutoProxyCreator(原因 实现了BeanPostProcessor 接口)
refresh() ->registerBeanPostProcessors()
PS: 源码分析 请点这
代理对象生成流程:
就本方法而言, 就是 mathCalculator 对象生成过程.
堆栈信息图:
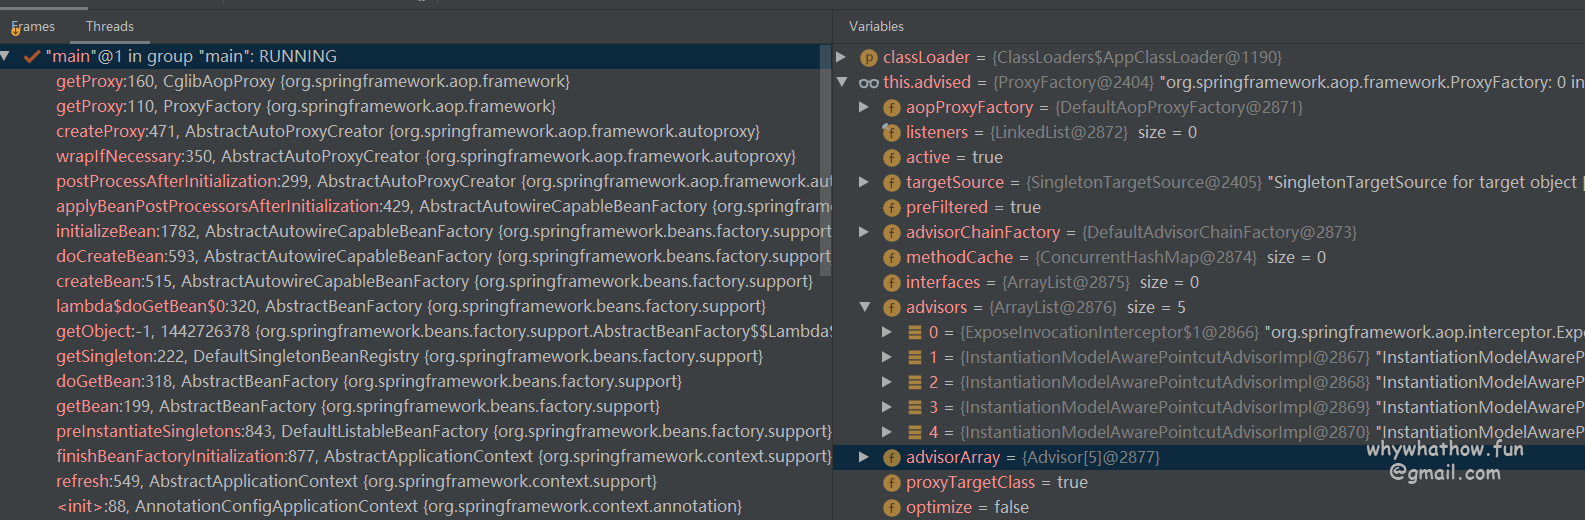
具体堆栈信息:
AbstractApplicationContext.refresh()
    -> AbstractApplicationContext.finishBeanFactoryInitialization()
   		-> ...
    	-> AbstractBeanFactory.doGetBean()
    		-> AbstractAutowiredCapableBeanFactory.doCreateBean()
    			->AbstractAutowiredCapableBeanFactory.initializatizeBean()
    				-> AbstractAutoProxyCreate.postProcessAfterInitialization()
    					-> AbstractAutoProxyCreator.getAdvicesAndAdvisorsForBean();// 获取所有的拦截器(Advisor)
    					-> AbstractAutoProxyCreator.wrapIfNecessary() // 判断是否需要增强当前bean
                            ->AbstractAutoProxyCreator.buildAdvisors();//构建当前bean的advisors
    						->AbstractAutoProxyCreator.createProxy() // 创建代理对象
    							->DefaultAopProxyFactory.createProxy() //生成 cglib || jdk 类型的AopProxy
    								->CglibAopProxy.getProxy()// 生成代理对象
源码分析 点击这
代理对象方法执行:
即 mathCalculator.div() 方法
时序图:
PS:许久未画时序图,图中表述可能存在错误,请见谅.
方法执行结果示图:
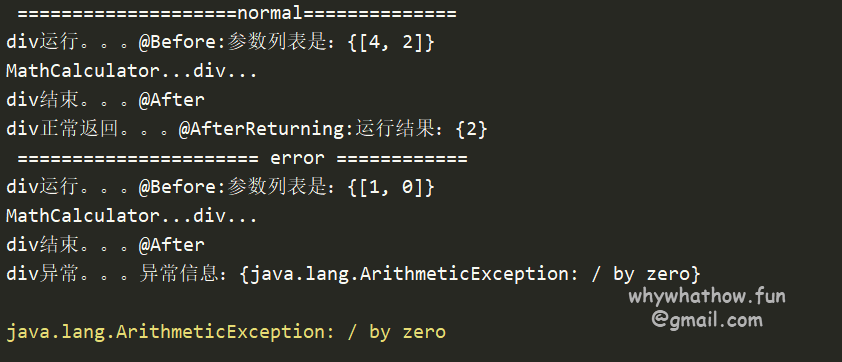
根据测试结果图可知:
mathCalculator.div() 执行结果分为两种情况:
1.正常执行: @Before -> div() -> @After -> @AfterReturning
2.捕获异常: @Before-> div() -> @After -> AfterThrowing -> Exception
堆栈信息图:

- 由图可知, div 方法执行流程是 mathCalculator.div() -> CglibAopProxy.intercept()-ReflectiveMethodInvocation.proceed()
proceed() 执行堆栈信息
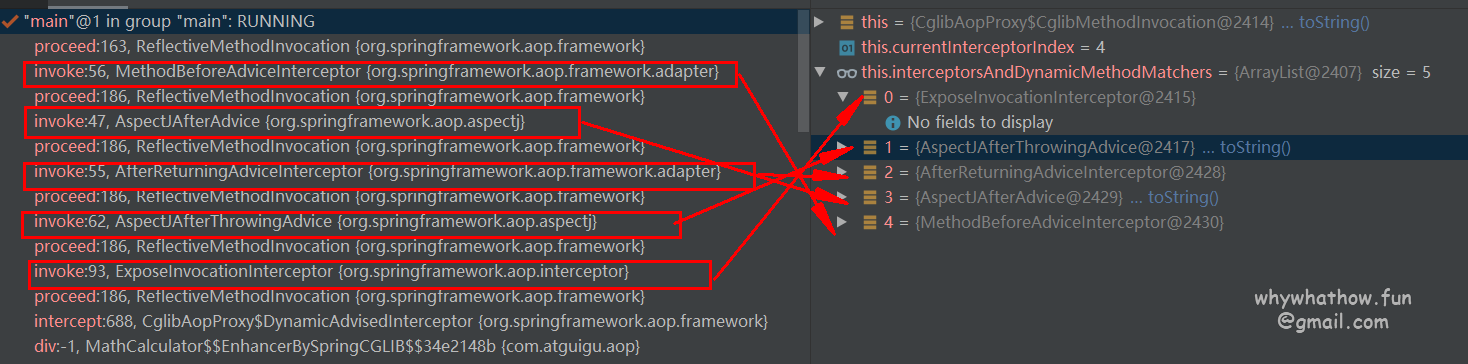
有图可知, **proceed()**默认执行是 :
ExposeInvocationInterceptor.invoke()
    ->AspectJAfterThrowingAdvice.invoke();//@AfterThrowing
		->AfterReturningAdviceInterceptor.invoke(); //@AfterReturning
			->AspectJAfterAdvice.invoke();	// @After
				 ->MethodBeforeAdviceInterceptor.invoke()// @Before
                     ->MethodBeforeAdviceInterceptor.before()// 前置通知
                 ->MethodProxy.invoke()// 目标方法执行 invokeJoinpoint();
            ->invokeAdviceMethod(getJoinPointMatch(), null, null);// @After 执行 增强方法
		-> advice.afterReturning(); //@AfterReturning 只有在不报异常的时候才执行(与@AfterThrowing 两选一个执行)
    ->  invokeAdviceMethod(getJoinPointMatch(), null, ex); //@AfterThrowing  执行异常 (与AfterReturning 二选一)
PS: 方法执行的具体源码分析请点这儿
源码分析:
开启AOP模块:
使用AspectJ 注解 :即使用@EnableAspectJAutoProxy
@Target(ElementType.TYPE)
@Retention(RetentionPolicy.RUNTIME)
@Documented
@Import(AspectJAutoProxyRegistrar.class)
public @interface EnableAspectJAutoProxy {
注册BeanDefinition
- AspectJAutoPRoxyRegistrar.class
@Override
	public void registerBeanDefinitions(
			AnnotationMetadata importingClassMetadata, BeanDefinitionRegistry registry) {
		// 注册aspectj注解自动代理创建器  即AnnotationAwareAspectJAutoProxyCreator
		AopConfigUtils.registerAspectJAnnotationAutoProxyCreatorIfNecessary(registry);
		// 获取注解元信息 k-v map 存储
		AnnotationAttributes enableAspectJAutoProxy =
				AnnotationConfigUtils.attributesFor(importingClassMetadata, EnableAspectJAutoProxy.class);
		if (enableAspectJAutoProxy != null) {//设置属性, exposeProxy ,and proxyTargetClass
			if (enableAspectJAutoProxy.getBoolean("proxyTargetClass")) {// 添加  proxyTargetClass 属性到 org.springframework.aop.config.internalAutoProxyCreator
				AopConfigUtils.forceAutoProxyCreatorToUseClassProxying(registry);
			}
			if (enableAspectJAutoProxy.getBoolean("exposeProxy")) {// 添加  exposeProxy 属性到 org.springframework.aop.config.internalAutoProxyCreator
				AopConfigUtils.forceAutoProxyCreatorToExposeProxy(registry);
			}
		}
}- AopConfigUtils.class
// 创建 或者升级 org.springframework.aop.config.internalAutoProxyCreator
	@Nullable
	private static BeanDefinition registerOrEscalateApcAsRequired(
			Class<?> cls, BeanDefinitionRegistry registry, @Nullable Object source) {
		Assert.notNull(registry, "BeanDefinitionRegistry must not be null");
		// 如果有 org.springframework.aop.config.internalAutoProxyCreator
		if (registry.containsBeanDefinition(AUTO_PROXY_CREATOR_BEAN_NAME)) {
			BeanDefinition apcDefinition = registry.getBeanDefinition(AUTO_PROXY_CREATOR_BEAN_NAME);
			if (!cls.getName().equals(apcDefinition.getBeanClassName())) {
				// 类加载顺序
				int currentPriority = findPriorityForClass(apcDefinition.getBeanClassName());
				int requiredPriority = findPriorityForClass(cls);
				if (currentPriority < requiredPriority) {
					apcDefinition.setBeanClassName(cls.getName());
				}
			}
			return null;
		}
		RootBeanDefinition beanDefinition = new RootBeanDefinition(cls); //cls:AspectJAnnotationAutoProxyCreator
		beanDefinition.setSource(source);
		beanDefinition.getPropertyValues().add("order", Ordered.HIGHEST_PRECEDENCE);
		beanDefinition.setRole(BeanDefinition.ROLE_INFRASTRUCTURE);
		registry.registerBeanDefinition(AUTO_PROXY_CREATOR_BEAN_NAME, beanDefinition);
		return beanDefinition;
	}
实例化对象

由图可知, 实例化对象的过程在 refresh() -> registerBeanPostProcessors() -> doGetBean() -> doCreateBean() 方法 , 为Spring 创建对象的流程, 所以在此不做分析.
需要的小伙伴 可以查看:
- Post not found: spring/Spring-02-getBean(beanName) Spring 源码分析 (02) -- 创建单例 Bean 流程解析
- Spring源码分析-03-createBean()过程解析
生成代理对象:
跳过 Spring bean创建bean的( doGetBean()-> doCreateBean()-> initializeBean()->applyBeanPostProcessorsAfterInitialization())这些流程, 从 AbstractAutoProxyCreator.postProcessAfterInitialization() 方法开始分析.
AbstractAutoProxyCreator.java
@Override
public Object postProcessAfterInitialization(@Nullable Object bean, String beanName) {
   if (bean != null) {
      Object cacheKey = getCacheKey(bean.getClass(), beanName);
      if (this.earlyProxyReferences.remove(cacheKey) != bean) {
         return wrapIfNecessary(bean, beanName, cacheKey);// 判断当前类是否需要增强.
      }
   }
   return bean;
}- wrapIfNecessary() 判断当前类是否需要增强,若需要,则创建代理对象
protected Object wrapIfNecessary(Object bean, String beanName, Object cacheKey) {
	if (StringUtils.hasLength(beanName) && this.targetSourcedBeans.contains(beanName)) {
		return bean;
	}//advisedBean中没有,则返回 bean
	if (Boolean.FALSE.equals(this.advisedBeans.get(cacheKey))) {
		return bean;
	}
	if (isInfrastructureClass(bean.getClass()) || shouldSkip(bean.getClass(), beanName)) {
		this.advisedBeans.put(cacheKey, Boolean.FALSE);
		return bean;
	}
	// 创建代理对象
	// Create proxy if we have advice. //1. 找interceptors 拦截器
	Object[] specificInterceptors = getAdvicesAndAdvisorsForBean(bean.getClass(), beanName, null);
	if (specificInterceptors != DO_NOT_PROXY) {
		this.advisedBeans.put(cacheKey, Boolean.TRUE);
		Object proxy = createProxy( // 2. 创建代理对象
				bean.getClass(), beanName, specificInterceptors, new SingletonTargetSource(bean));
		this.proxyTypes.put(cacheKey, proxy.getClass());
		return proxy;
	}

	this.advisedBeans.put(cacheKey, Boolean.FALSE);
	return bean;
}- createProxy()
protected Object createProxy(Class<?> beanClass, @Nullable String beanName,
		@Nullable Object[] specificInterceptors, TargetSource targetSource) {
	// 1. 构建当前bean的proxyFactory
	ProxyFactory proxyFactory = new ProxyFactory();
	proxyFactory.copyFrom(this);
	// 2.根据beanName, 绑定对应的advisors   即 绑定 类与其对应的增强方法
	Advisor[] advisors = buildAdvisors(beanName, specificInterceptors);
		//... .省略proxyFactory设置属性代码
       // 3获取代理对象
	return proxyFactory.getProxy(getProxyClassLoader());
}
ProxyFactory.java
public Object getProxy(@Nullable ClassLoader classLoader) {
   return createAopProxy().getProxy(classLoader);//
}
DefaultProxyFactory.java
- 判断targetClass 类型,若是接口类型,则使用JDK代理,不是的话,则用 cglib代理
@Override
public AopProxy createAopProxy(AdvisedSupport config) throws AopConfigException {
   if (config.isOptimize() || config.isProxyTargetClass() || hasNoUserSuppliedProxyInterfaces(config)) {
      Class<?> targetClass = config.getTargetClass();
      if (targetClass == null) {
         throw new AopConfigException("TargetSource cannot determine target class: " +
               "Either an interface or a target is required for proxy creation.");
      }// 判断 targetClass 是否是接口
      if (targetClass.isInterface() || Proxy.isProxyClass(targetClass)) {
         return new JdkDynamicAopProxy(config);// jdk proxy
      }
      return new ObjenesisCglibAopProxy(config);// cglib proxy
   }
   else {
      return new JdkDynamicAopProxy(config);
   }
}
**PS: getProxy() 过程就不给出代码了, 有需要自己去看,在CglibAopProxy.getProxy() 以及JdkDynamicAopProxy.getProxy() **
目标方法执行:
流程:
1. 拦截目标方法
2.  调用methodInterceptor, 对目标方法进行增强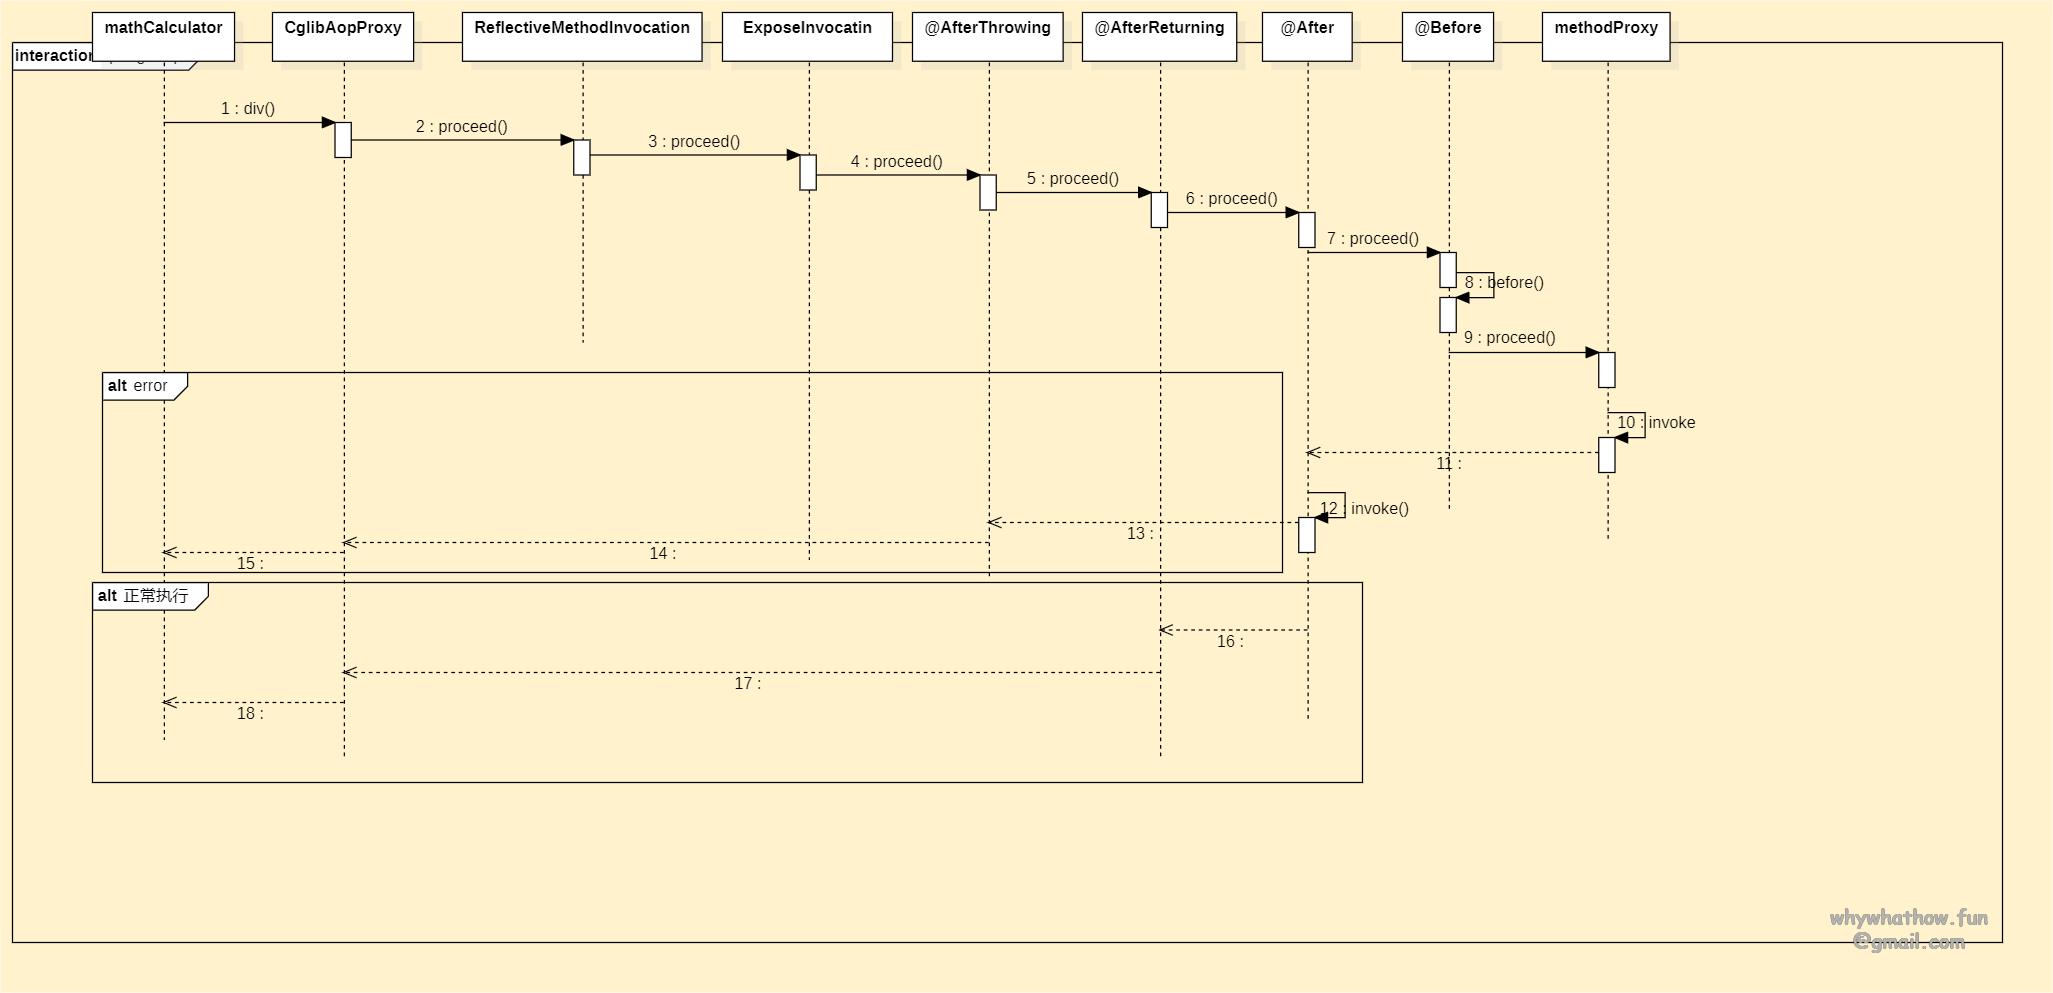
拦截目标方法:
- CglibAopProxy.class
public Object intercept(Object proxy, Method method, Object[] args, MethodProxy methodProxy) throws Throwable {
			Object oldProxy = null;
			boolean setProxyContext = false;
			Object target = null;// 目标对象
			TargetSource targetSource = this.advised.getTargetSource();
			try {
				if (this.advised.exposeProxy) {
					// Make invocation available if necessary.
					oldProxy = AopContext.setCurrentProxy(proxy);
					setProxyContext = true;
				}
				// Get as late as possible to minimize the time we "own" the target, in case it comes from a pool...
				target = targetSource.getTarget();// 获取目标类 targetClass
				Class<?> targetClass = (target != null ? target.getClass() : null);// 获取 拦截器链 Advisors 链
				List<Object> chain = this.advised.getInterceptorsAndDynamicInterceptionAdvice(method, targetClass);
				Object retVal;//返回值
				// Check whether we only have one InvokerInterceptor: that is,
				// no real advice, but just reflective invocation of the target.
				if (chain.isEmpty() && Modifier.isPublic(method.getModifiers())) {// 处理没有advisor 的 target
					// We can skip creating a MethodInvocation: just invoke the target directly.
					// Note that the final invoker must be an InvokerInterceptor, so we know
					// it does nothing but a reflective operation on the target, and no hot
					// swapping or fancy proxying.
					Object[] argsToUse = AopProxyUtils.adaptArgumentsIfNecessary(method, args);
					retVal = methodProxy.invoke(target, argsToUse);
				}
				else {// 拦截方法
					// We need to create a method invocation... 创建方法实现体, 并调用proceed()
					retVal = new CglibMethodInvocation(proxy, target, method, args, targetClass, chain, methodProxy).proceed();
				}
				retVal = processReturnType(proxy, target, method, retVal);
				return retVal;
			}
			finally {
				if (target != null && !targetSource.isStatic()) {
					targetSource.releaseTarget(target);
				}
				if (setProxyContext) {
					// Restore old proxy.
					AopContext.setCurrentProxy(oldProxy);
				}
			}
		}
proceed()
简单描述下proceed() 做的事情: 执行目标方法+增强方法
- @Before -> 目标方法 -> @After ->@AfterReturning || @AfterThrowing 的顺序执行.
源码的实现: 利用压栈(形成一条链)
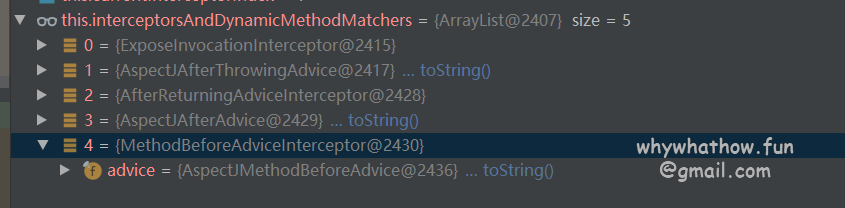
- 正序遍历 this.InterceptorsAndDynamicMethodMatchers,获取到每个方法拦截器 执行每个方法拦截器的invoke()方法,
- 即按照 ExpostInvocationInterceptor -> @AfterThrowing -> @AfterReturing->@After-> @Before 顺序进行压栈, 然后执行methodProxy.invoke方法.然后依次返回, 依次调用各个方法拦截器 MethodInterceptor对应的方法.
- 正序遍历 this.InterceptorsAndDynamicMethodMatchers,获取到每个方法拦截器 执行每个方法拦截器的invoke()方法,
ReflectiveMethodInvocation.class
public Object proceed() throws Throwable {
		//	We start with an index of -1 and increment early.// this.currentInterceptorIndex =-1 (default)
		if (this.currentInterceptorIndex == this.interceptorsAndDynamicMethodMatchers.size() - 1) {
			return invokeJoinpoint();// 执行目标方法
		}

		Object interceptorOrInterceptionAdvice =
				this.interceptorsAndDynamicMethodMatchers.get(++this.currentInterceptorIndex);
		if (interceptorOrInterceptionAdvice instanceof InterceptorAndDynamicMethodMatcher) {
			// Evaluate dynamic method matcher here: static part will already have
			// been evaluated and found to match.
			InterceptorAndDynamicMethodMatcher dm =
					(InterceptorAndDynamicMethodMatcher) interceptorOrInterceptionAdvice;
			Class<?> targetClass = (this.targetClass != null ? this.targetClass : this.method.getDeclaringClass());
			if (dm.methodMatcher.matches(this.method, targetClass, this.arguments)) {
				return dm.interceptor.invoke(this);
			}
			else {
				// Dynamic matching failed.
				// Skip this interceptor and invoke the next in the chain.
				return proceed();
			}
		}
		else {
			// It's an interceptor, so we just invoke it: The pointcut will have
			// been evaluated statically before this object was constructed.
			return ((MethodInterceptor) interceptorOrInterceptionAdvice).invoke(this);
		}
	}
吐槽:
目标方法+ 方法 拦截器 的源码可阅读性有点差,不如改成for循环遍历的形式.(仅代表我自己的观点.)
总结:
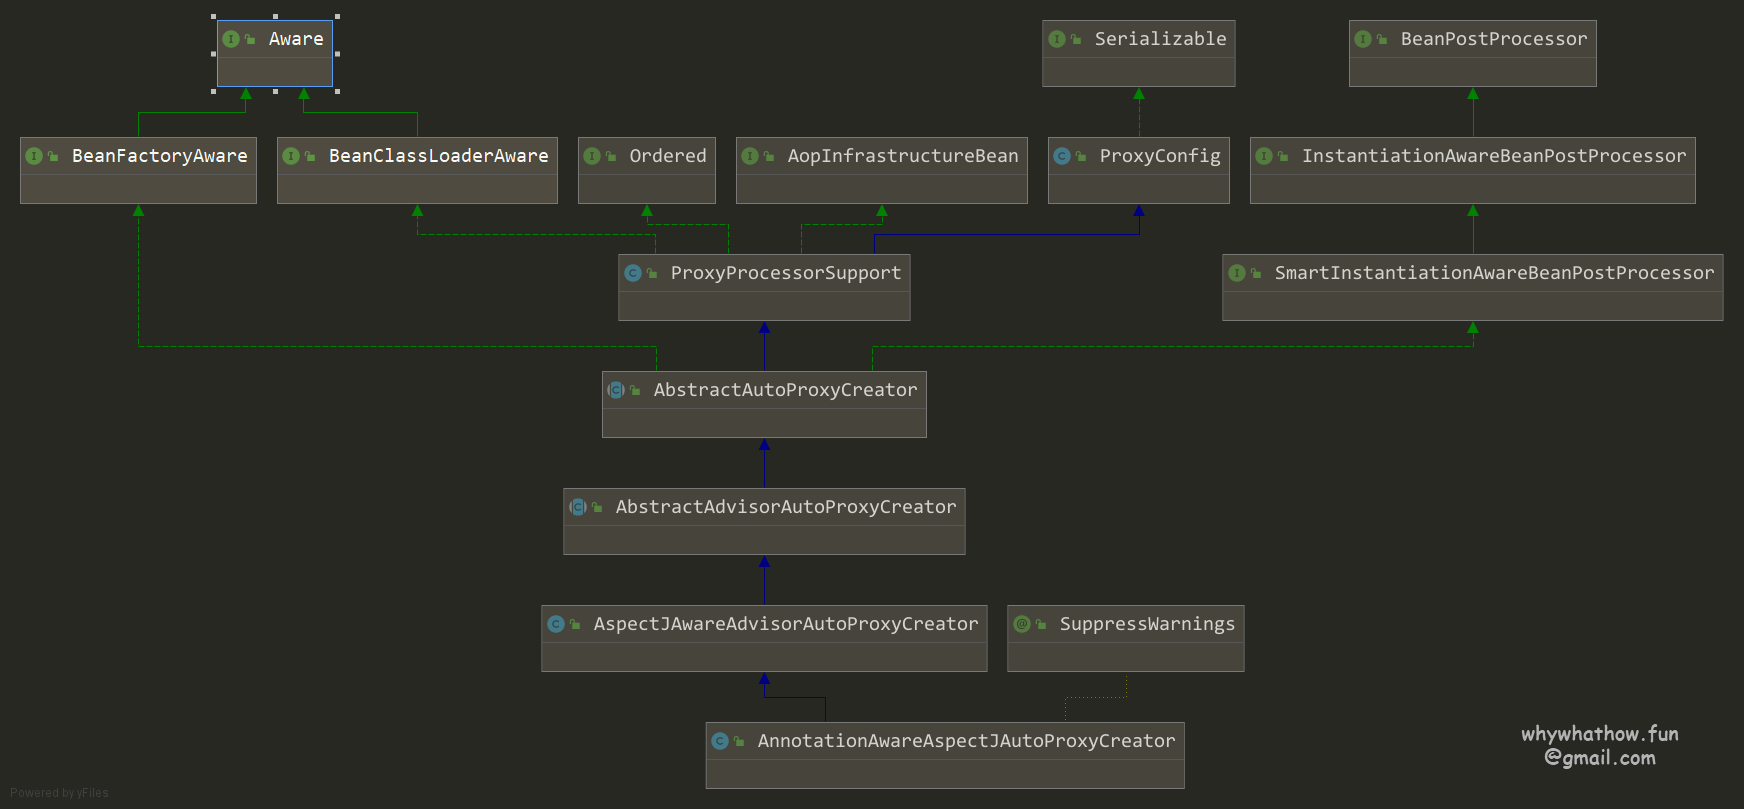
- @EnableAspectJAutoProxy 注解开启:
- 注册beanDefinition : invokeBeanFactoryPostProcessors()
- 生成实例 : registerBeanPostProcessors()
- 目标对象生成:
- refresh() -> finishBeanFactoryInitialization()-> doGetBean()-> doCreateBean() -> initializeBean()->applyBeanPostProcessorAfterInitialization() -> postProcessorAfterInitialization()
- wrapIfNecessary() // 判断是否需要对Bean 对象进行增强, 即生成代理对象.
- getAdvicesAndAdvisorsForBean(bean.getClass(), beanName, null);// 获取增强方法,即拦截器链即Advisors
- buildAdvisors(beanName, specificInterceptors);// 将Advisors 与bean绑定
- createAopProxy(AdvisedSupport config)// 判断 代理方式 JDK || Cglib
- getProxy() // 生成代理对象
- 目标方法执行:
- 按照 @Before -> 目标方法 -> @After ->@AfterReturning || @AfterThrowing 的顺序执行.
参考:
- Post not found: spring/Spring-02-getBean(beanName) Spring 源码分析 (02) -- 创建单例 Bean 流程解析
- Spring源码分析-03-createBean()过程解析
- https://docs.spring.io/spring-framework/docs/current/reference/html/core.html#aop