Spring源码分析-07-SpringBoot启动流程分析
内容简介: 本文主要描述了SpringBoot 的启动流程, 内容较为枯燥, 建议读者自行debug.
- PS: 若文章字体偏大或者偏小,建议通过 ctrl键+鼠标滑轮 进行修改,以提升阅读效果.(带来不便,请谅解!)
Version
- JDK: 1.8
- Spring Boot : 2.3.4
测试案例
测试类:
@SpringBootApplication
public class MainApplication {
    public static void main(String[] args) {
        SpringApplication.run(MainApplication.class, args);
    }
}
人话描述整体流程:
SpringBoot 的启动流程 整体上分为两个流程:
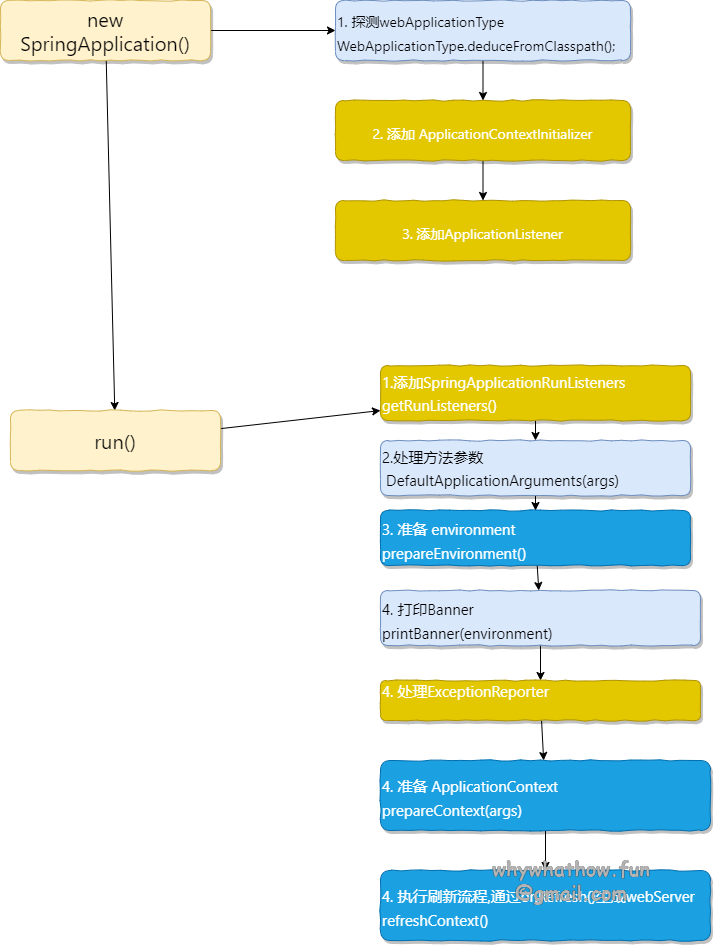
生成 SpringApplication 对象
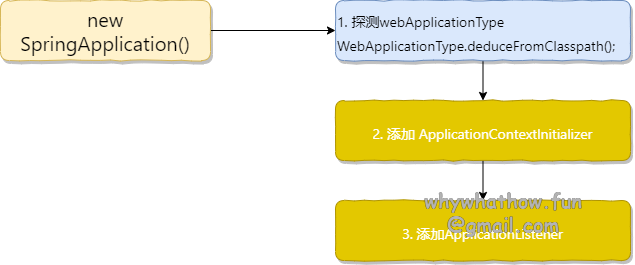
- 推测web服务应用类型 reactive | servlet | NONE
- 根据META-INF/spring.factories 配置 应用上下文初始化器– ApplicationContextInitializer.
- 利用META-INF/spring.factories 获取 与 ApplicationContextInitializer 有关类的全路径名.即url地址
- 利用 classloader 生成实例
- 注入到SpringApplication中
- 根据META-INF/spring.factories 配置 应用监听器 ApplicationListener.(过程与ApplicationContextInitializer 相似,不再赘述)
调用 SpringApplication.run() 方法, 启动Spring Boot

- 记录启动时间 ,stopwatch.start()
- 获取ApplicationRunListener的子类们 用来发布context 在各个阶段的通知消息.
- 处理 参数args ,若有参数,生成对应的springArgements, 用于注入配置信息
- 生成environment. 即prepareEnvironment(listeners, applicationArguments)
- 打印 banner
- 根据web应用类型(webApplicationType) 生成 对应的ApplicationContext
- 根据web应用类型生成对应的异常报告器 即exceptionReporter
- 初始化 ApplicationContext – prepareContext()
- 设置属性值(environment) , 以及执行ApplicationContextInitializer. 初始化方法
- 添加一些singleton,beanFactoryPostProcessor
- 加载启动类
- 刷新容器 refreshContext()
- 调用AbstractApplicationContext.refresh() 流程
- onRefresh() 方法回调, 生成webServer() 默认**[server 类型与 导入的server maven 包有关.]**
- afterRefresh() 回调接口
- stopwatch.stop() 停止计时
ApplicationRunListener :
类图:
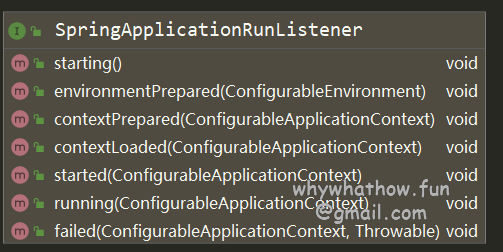
发布事件顺序大致如下
(最简单的查看方法, 看 ApplicationRunListener 接口函数)
listeners.starting();//  发布启动事件
listeners.environmentPrepared(environment);//应用启动监听器 发布事件通知 environmentPrepared

listeners.contextPrepared(context);//ApplicationContextRunListener 发布contextPrepared事件
listeners.contextLoaded(context);//发布事件
listeners.started(context);// 发布started 事件
listeners.running(context);//发布running 事件
listeners.faied()
源码分析:
生成SpringBoot 对象:
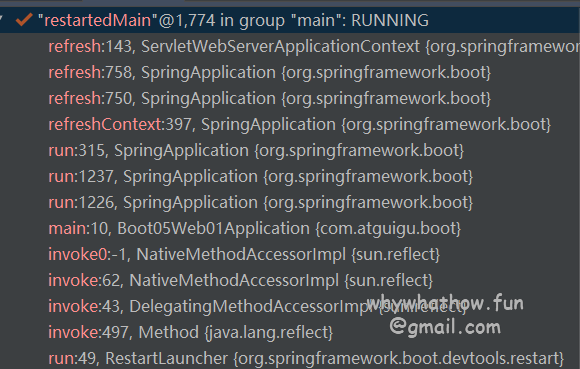
调用栈信息:

SpringApplication.class
public SpringApplication(ResourceLoader resourceLoader, Class<?>... primarySources) {
		this.resourceLoader = resourceLoader;
		Assert.notNull(primarySources, "PrimarySources must not be null");
		this.primarySources = new LinkedHashSet<>(Arrays.asList(primarySources));//
		this.webApplicationType = WebApplicationType.deduceFromClasspath();// 推测web服务器类型 reactive| servlet | none
		setInitializers((Collection) getSpringFactoriesInstances(ApplicationContextInitializer.class));// 根据Spring.factories 配置文件获取到应用上下文Initializer即 ApplicationContextInitializer
		setListeners((Collection) getSpringFactoriesInstances(ApplicationListener.class));// 同理,获取应用监听器
		this.mainApplicationClass = deduceMainApplicationClass();// 推测mainApplcation类信息
	}
以获取SpringContextInitializer 为例讲述 SpringBoot 通过META-INF/spring.factories 获取类的全路径名称来设计应用初始化器.
SetInitializers()
- SpringApplication.class
private <T> Collection<T> getSpringFactoriesInstances(Class<T> type, Class<?>[] parameterTypes, Object... args) {
	ClassLoader classLoader = getClassLoader();
	// Use names and ensure unique to protect against duplicates// 利用spring.factories去查type 类型的class
	Set<String> names = new LinkedHashSet<>(SpringFactoriesLoader.loadFactoryNames(type, classLoader));// 根据spring.factories, 查找与type相关的 class 的全路径名
	List<T> instances = createSpringFactoriesInstances(type, parameterTypes, classLoader, args, names);// 根据name 实例化对象
	AnnotationAwareOrderComparator.sort(instances);//排序
	return instances;
}
内容挺简单的,不再给出更深层次的代码,有兴趣的自己debug.
启动流程

- SpringApplication.class
public ConfigurableApplicationContext run(String... args) {
	StopWatch stopWatch = new StopWatch();
	stopWatch.start();// 记录启动时间
	ConfigurableApplicationContext context = null;
	Collection<SpringBootExceptionReporter> exceptionReporters = new ArrayList<>();// 异常记录器
	configureHeadlessProperty();//设置  java.awt.headless 属性值 不重要
	SpringApplicationRunListeners listeners = getRunListeners(args);
	listeners.starting();// 开启
	try {
		ApplicationArguments applicationArguments = new DefaultApplicationArguments(args);// 启动参数
		ConfigurableEnvironment environment = prepareEnvironment(listeners, applicationArguments);//生成environment
		configureIgnoreBeanInfo(environment);//设置属性"spring.beaninfo.ignore"
		Banner printedBanner = printBanner(environment); // 打印banner
		context = createApplicationContext();//根据web类型生成对应 applicationContext
		exceptionReporters = getSpringFactoriesInstances(SpringBootExceptionReporter.class,
				new Class[] { ConfigurableApplicationContext.class }, context);//获取与context 类型对应的exceptionReporter
		prepareContext(context, environment, listeners, applicationArguments, printedBanner);//1. 属性设置
		refreshContext(context); //调用AbstractApplicationContext.refresh() 流程
		afterRefresh(context, applicationArguments);
		stopWatch.stop();//停止计时
		if (this.logStartupInfo) {
			new StartupInfoLogger(this.mainApplicationClass).logStarted(getApplicationLog(), stopWatch);
			}
		listeners.started(context);// 发布started 事件
		callRunners(context, applicationArguments);
	}
	catch (Throwable ex) {
		handleRunFailure(context, ex, exceptionReporters, listeners);// 处理异常, 抛出, 报错
		throw new IllegalStateException(ex);
	}

	try {
		listeners.running(context);//发布running 事件
	}
	catch (Throwable ex) {
		handleRunFailure(context, ex, exceptionReporters, null);// 处理异常, 抛出, 报错
		throw new IllegalStateException(ex);
	}
	return context;
}
由于本文内容与本系列文章内容重复度过高以及全部给出源码后文章篇幅过于冗余,所以本文将主要描述prepareContext() 以及refreshContext() 这两个方法, 一个属性赋值, 一个是spring结合.
prepareContext()
- SpringApplication.class
private void prepareContext(ConfigurableApplicationContext context, ConfigurableEnvironment environment,
			SpringApplicationRunListeners listeners, ApplicationArguments applicationArguments, Banner printedBanner) {
		//1. 设置属性值, 以及执行ApplicationContextInitializer. 初始化方法,发布contextPrepared事件
		context.setEnvironment(environment);
		postProcessApplicationContext(context);//设置beanNameGenerator, resourceloader, conversionService
		applyInitializers(context);// 调用ApplicationContextInitializer的初始化方法
		listeners.contextPrepared(context);//ApplicationContextRunListener 发布contextPrepared事件
		if (this.logStartupInfo) {
			logStartupInfo(context.getParent() == null);
			logStartupProfileInfo(context);
		}//2. 添加一些singleton, beanFactoryPostProcessor
		// Add boot specific singleton beans 添加一些singleton :ApplicationArguments,SpringBanner,
		ConfigurableListableBeanFactory beanFactory = context.getBeanFactory();
		beanFactory.registerSingleton("springApplicationArguments", applicationArguments);
		if (printedBanner != null) {
			beanFactory.registerSingleton("springBootBanner", printedBanner);
		}
		if (beanFactory instanceof DefaultListableBeanFactory) {
			((DefaultListableBeanFactory) beanFactory)
					.setAllowBeanDefinitionOverriding(this.allowBeanDefinitionOverriding);
		}
		if (this.lazyInitialization) {
			context.addBeanFactoryPostProcessor(new LazyInitializationBeanFactoryPostProcessor());
		}// 3. 加载启动类
		// Load the sources
		Set<Object> sources = getAllSources();
		Assert.notEmpty(sources, "Sources must not be empty");
		load(context, sources.toArray(new Object[0]));
		listeners.contextLoaded(context);//发布事件
	}
refreshContext()
- 整个过程可以简单描述为:执行AbstractApplicationContext.refresh() 方法, 然后通过调用子类ServletWebServerApplicationContext.onRefresh() 方法来 生成webServer服务器 [嗯,就是这些, 又是凌晨了,尬].
调用栈信息:
- SpringApplication.class
private void refreshContext(ConfigurableApplicationContext context) {
		refresh((ApplicationContext) context);
		if (this.registerShutdownHook) {
			try {
				context.registerShutdownHook();
			}
			catch (AccessControlException ex) {
				// Not allowed in some environments.
			}
		}
}- ServletWebServerApplicationContext.class
@Override
	public final void refresh() throws BeansException, IllegalStateException {
		try {
			super.refresh();
		}
		catch (RuntimeException ex) {
			WebServer webServer = this.webServer;
			if (webServer != null) {
				webServer.stop();
			}
			throw ex;
		}
	}

	@Override
	protected void onRefresh() {
		super.onRefresh();
		try {
			createWebServer();// 创建webserver
		}
		catch (Throwable ex) {
			throw new ApplicationContextException("Unable to start web server", ex);
		}
	}
补充说明:
类似于@EnableXXX 标签, Spring 的统一处理是 :
refresh() -> invokeBeanFactoryPostProcessor()->registerBeanPostProcessor() 过程中导入到Spring中.
总结:
- SpringBoot 启动流程:
- 创建SpringApplication
- 利用META-INF/spring.factories 机制 来注入 class文件(模仿java SPI机制, 说白了, 类加载器,利用类的全路径名生成类对象的过程)
- SpringApplication.run()
- 各种SpringApplication基本属性 environment, args, exceptionReporter,banner,…设置, 以及listener 的事件派送机制
- 根据web服务器类型生成 context, 利用onRefresh()生成web服务器(PS: 跟换web服务器, 改maven web包)
- 创建SpringApplication
参考:
猜你喜欢